Kubernetes In Action
 Written by Marko Lukša, Kubernetes In Action is a fantastic book covering all operational aspects of Kubernetes. I find it very hard to think of a better book on the subject. This is the first edition of the book, published in December 2017, and although dated around the edges and details, Marko’s in-depth dive into the different components that make up Kubernetes and how they work is timeless. I highly recommend this book to anyone looking for any serious learning of Kubernetes. This book’s shelf life is pretty long despite Kubernetes’ active development - I would think it can only be supplanted by the second edition coming out early next year1.
Kubernetes In Action provided me with solid a theoretical and practical foundation on Kubernetes, enabling me to earn the Certified Kubernetes Application Developer badge.
Check out some other books I’ve read on the bookshelf.
Summary
Kubernetes In Action’s roadmap takes us on a journey with the end goal of developing Kubia - a contrived sample application - while exploring the core concepts of Kubernetes in depth. Beyond the basics, some of the things this book explains are Kubernetes’ architecture, how pods communicate with each other, how to secure your K8S cluster, pod affinity and anti-affinity, tolerations, the API service, and how to extend Kubernetes with custom resources. The reader is kept engaged with practical exercises throughout by applying configurations and testing them. These configurations and extra resources can be found in the book’s GitHub repository.
Tools and runtimes
Kubernetes comes in several flavors. “Vanilla” Kubernetes can be installed using kubeadm. Other flavors, such as minikube, make it very easy to install a local Kubernetes cluster for development purposes.
The primary way to interact with a Kubernetes cluster is with kubectl23. You can install it directly using the official instructions, but other installation means are available, such as with gcloud components install kubectl if GKE is your provider.
Normally kubectl is automatically configured by your Kubernetes provisioner with the necessary configuration to interact with the cluster. For example, here is what my configuration looks like after running minikube start4:
Hands On
Run
kubectl config viewto view your local configuration:Example
kubectl supports drop-in plugins since v1.12. The community has provided many plugins, some of which I find immensely useful. I’ll write about these in a future article.
System components
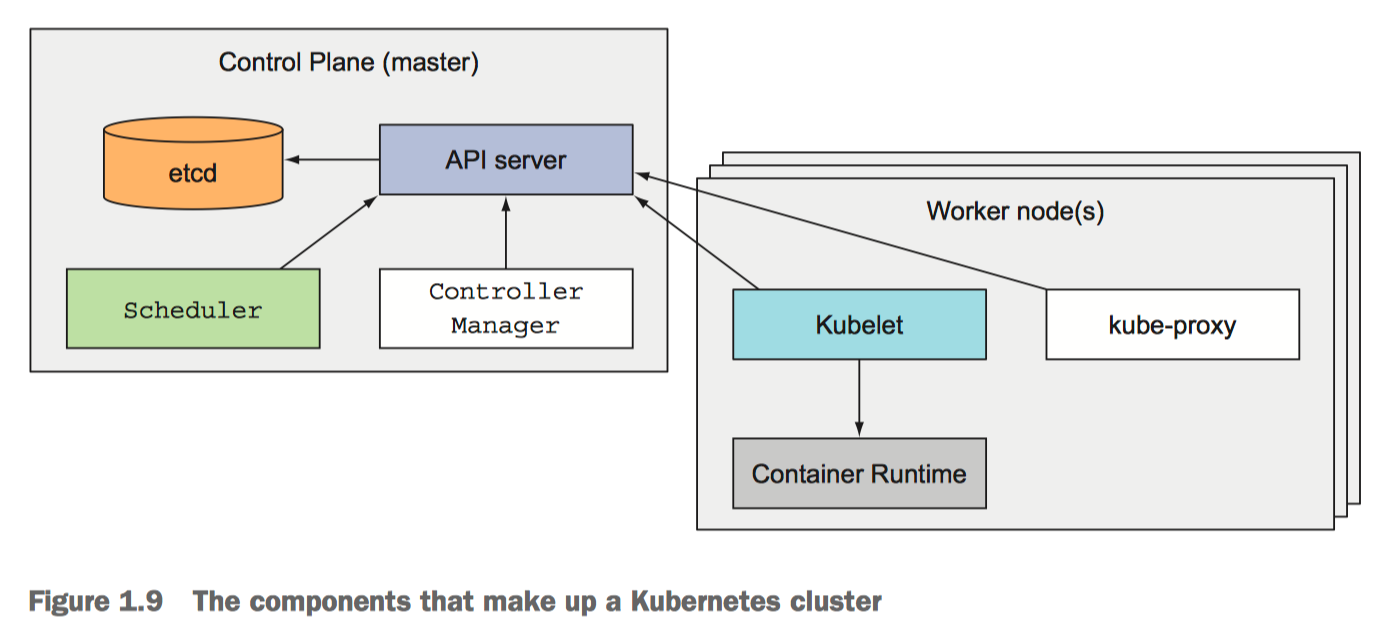 From Chapter 1, section 1.3.3 Understanding the architecture of a Kubernetes cluster
There are two sets of components:
Control Plane components
These components are in charge of monitoring and responding to events in the cluster.
- The API server (
kube-apiserver) exposes a REST API and is whatkubectlinteracts with then you execute its commands. The other components also discover the state of the cluster via the API server. - The Controller Manager (
kube-controller-manager) is the control loop that reconciles the cluster’s actual state with the desired state. - The Scheduler (
kube-scheduler) assigns Pods unto nodes for them to run. There are many reasons why a pod may not be scheduled unto nodes and some of those reasons can have side effects, such as an automatic scale up of the cluster’s node pool. You will probably spend a lot of time figuring out the scheduler and looking at Pod event logs at some point or another. - etcd is the distributed key-value store used by most Kubernetes clusters.
Node components
These are components that run in each node and are used to realize the configurations sent out by the components in the control plane.
kubeletruns containers specified in Pod specs and monitors their health.kube-proxyis a network proxy that implements part of the Kubernetes Service concept. It takes the network rules configured by the control plane components and applies them locally to the node’s IP routing rules. It has different modes of operation; there is a nice explanation here about its modes.Container Runtimeare what run the containers (eg. docker, containerd).
Kubernetes Resources
Kubernetes is a massive beast. Here are (almost) all the resources I am aware of as a developer5:
 Arrows indicate references to the target component.
Kubernetes In Action covers all of these objects and more. I am only going to gloss over a handful of the most important ones.
Namespace
Don’t let its distance and disconnection from other nodes in the diagram above mislead you: namespace is one of the most fundamental concepts in Kubernetes, as it lets developers and administrators separate different resources into logical groups. For example, environments such as dev, staging, and prod, can reside in different namespaces within the same K8S cluster. Another popular use of namespaces is to group resources belonging to applications with cross-cutting concerns.
Adding a connection to Namespace from every resource that references it would make the diagram unwieldy!
Beyond grouping user resources into logical units, it is important to understand that some built-in resources are scoped to the namespace they are declared in and others operate across the whole cluster. For those that are namespaced, the default namespace is the default if none is specified.
Hands On
Declaratively set namespace with
metadata.namespace:Example
Set namespace withkubectl:Example
View all namespaces for a given cluster/context:Example
$ kubectl get ns NAME STATUS AGE default Active 63d istio-system Active 59d kube-node-lease Active 63d kube-public Active 63d kube-system Active 63d
List all resources and see which are namespaced and which aren’t:Example
Pod
Pods are the smallest deployable units of computing that you can create and manage in Kubernetes. Pods are composed of one or more containers with shared storage and network resources.
Containers are instances of pre-packaged images (or “snapshots”) of executable software that can be run on any platform, including Kubernetes. Pods are what run your application.
The Pod resource is centered in the diagram above because it is the workhorse of a Kubernetes application deployment. We’ll explore most of those other objects in later sections.
All roads lead to Pods.
– me
Hands On
Use
kubectl runto create and run Pods imperatively:Example
Pods are composed of one or more containers; these containers can be divided into three types:
- containers: these are your regular containers that run your application workload.
- initContainers: similar to regular containers except that kubelet runs them first before regular containers. All
initContainersmust run successfully for regular containers to be started. Their use case is obvious: use them to execute utilities or setup scripts not present in the regular container. Sadly,kubectl rundoes not support specifying initContainers, so we have to add them to the Pod’s spec manually. - ephemeralContainers: these containers are added to the pod at runtime when debugging a Pod. They are not part of the Pod’s original manifest.
Hands On
kubectl runcannot addinitContainersto a Pod. You must add them yourself:Example pod with initContainers
PersistentVolumeClaims and PersistentVolumes
A PersistentVolume provisions storage for use by Pods. They can be created either statically or dynamically. A PersistentVolumeClaim is a request for a PersistentVolume. A PVC specifies the amount of storage requested and, if a suitable PV is found then the PVC is bound to the PV, otherwise a new PV may be provisioned, depending on the PVC’s StorageClass. A Pod (or a PodTemplate) can reference a PVC and mount it in one or more of its containers.
We’ll cover PVs and PVCs in depth in a later article.
Deployment
Deployments manage the state of a set of one or more pods. This is important for a number of use cases, such as scaling the number of pods or updating the application workload’s version.
You describe a desired state in a Deployment, and the Deployment Controller changes the actual state to the desired state at a controlled rate.
Under the hood a deployment uses a ReplicaSet to manage a set of pods for a given state. The latter deprecates and replaced the old ReplicationController.
A ReplicaSet’s purpose is to maintain a stable set of replica Pods running at any given time. As such, it is often used to guarantee the availability of a specified number of identical Pods.
Hands On
Create a deployment with
kubectl create deploy:Example
StatefulSet
StatefulSets are very similar to Deployments with a big distinction: each pod managed by a StatefulSet has a unique persistent identity which you can match to specific storage volumes (these are described further down). This makes the StatefulSet particularly useful for distributed applications such as CouchDB, Redis, Hyperledger Fabric, and many others.
Note: a Headless Service is required for StatefulSets.
Note:
kubectldoes not have a command to create statefulsets.
Hands On
Here’s a simple example from the Kubernetes docs:
Example
Deploying the above in my local
minikubecluster usingkubectl apply -f <filename>we can see:Example
$ kubectl get statefulset web NAME READY AGE web 3/3 80s
$ kubectl get po NAME READY STATUS RESTARTS AGE web-0 1/1 Running 0 2m53s web-1 1/1 Running 0 2m33s web-2 1/1 Running 0 2m13sIf you describe the pods you’ll realize each has an associated
PersistentVolumeClaim:Example
And when describing that PVC you’ll see it’s associated with a unique
PersistentVolume:Example
$ kubectl describe pvc www-web-2 Name: www-web-2 Namespace: default ... Volume: pvc-33f94fdb-9e17-4ee6-a2e7-0b10d88699e3 ... Used By: web-2 ...Scaling the statefulset down does not delete the PVs:
Example
Scaling the statefulset back up does not create new PVCs; the existing PVCs are assigned to the pods in order:
Example
HorizontalPodAutoscaler
Horizontal scaling means that the response to increased load is to deploy more Pods. This is different from vertical scaling, which for Kubernetes would mean assigning more resources (for example: memory or CPU) to the Pods that are already running for the workload.
HPAs will update the .spec.replicas of Deployments and StatefulSets using metrics collected from the Metrics Server, as input. The Metrics Server is the default source of container metrics for autoscaling pipelines.
Note: Kubernetes does not provide vertical pod autoscalers out of the box6. You can install the autoscaler developed within the Kubernetes project umbrella, or you may use your K8S provider’s offering, such as GKE’s Vertical Pod autoscaling. A vertical pod autoscaler will automatically update the Pod’s resource requests and limits.
Service
Exposing services in Kubernetes both within and without would be more cumbersome if not for Service objects. Pods are not permanent resources; Services fill in the gap by providing a stable DNS name for a set of Pods. The target pods are selected by matching labels.
There are four types of services:
ClusterIP(default): the service will only be reachable within the cluster.NodePort: allocates a port number on every node (.spec.ports[*].nodePort) and forwards incoming traffic to the port exposed by the service (.spec.ports[*].port). NodePort servicesLoadBalancer: exposes the service to traffic originating from outside the cluster. The machinery used to do this depends on the platform.ExternalName: these map DNS names from within the cluster to external names. In other words, the cluster’s DNS service will returnCNAMErecords instead ofArecords for queries targeting the service’s name.
There is a special kind of Service called a Headless Service that does not perform load-balancing and does not provide a single address for the backing Pods. Instead, it serves to list IP addresses of all the Pods it selects. This type of Service are required for StatefulSets.
Hands On
Use
kubectl create svcto create services imperatively:Example
The problem with
kubectl create svcis that you can’t specify aselector. Services without selectors have their uses, but you are more likely to want to point your service to a set of pods in your cluster. For this use case you can either write the spec manually or usekubectl expose.Example
Ingress
Ingress exposes HTTP and HTTPS routes from outside the cluster to services within the cluster. Traffic routing is controlled by rules defined on the Ingress resource.
An Ingress is an L7 proxy tailored for HTTP(S) services, allowing request routing based on simple rules such as path prefixes7. Note that if you want to expose your services outside your cluster with something other than HTTP, you’d have to use Services of type NodePort or LoadBalancer.
Hands On
Use
kubectl create ingto create an Ingress imperatively:Example
Footnotes
It appears you can use code au35luk to get a 35% discount . ↩︎
Fondly pronounced by many as “cube cuddle”. ↩︎
Other ways include a console offered by your cloud provider in cases where Kubernetes is available as a service. ↩︎
We will explore the configuration in depth in a future article - stay tuned. ↩︎
As a developer I am not including objects that I’m not likely to encounter in may day-to-day, such as
TokenRevieworEndpointSlice. These will typically be objects configured by an administrator role, or perhaps are objects managed by the underlying K8S provider, such as GKE. ↩︎I’ve never used a VPA. That said, they might help size your nodes adequately, or have you consider making your pods more efficient. ↩︎
For more advanced routing you should probably make use of a service mesh such as Istio (see VirtualService), or you can explore the Gateway API that recently graduated to beta status! ↩︎